Setting Up Wired/Wireless Connection to Comcast Xfinity Gateway
Setting up both a wired and wireless connection to a Comcast Xfinity Gateway is a straightforward process. The Comcast Xfinity Gateway is a combination modem and router that provides internet connectivity to your home. Follow these step-by-step instructions to configure both a wired and wireless connection:
Before you begin:
Make sure you have your Comcast Xfinity Gateway, power cord, and Ethernet cable ready.
Have your Comcast account information handy, including your account number and PIN.
Setting up a Wired Connection:
Power On: Plug in the Comcast Xfinity Gateway to a power outlet and turn it on using the power button, if available. Allow a few minutes for the Gateway to boot up.
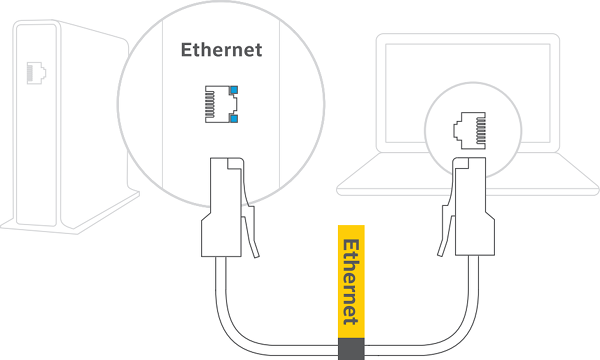
Connect Ethernet Cable: Take one end of the Ethernet cable and plug it into the LAN port on the back of the Gateway. Plug the other end of the Ethernet cable into the Ethernet port of your computer or device.
Obtain an IP Address: In most cases, your computer will automatically obtain an IP address from the Gateway. If not, you may need to restart your computer or check your network settings to ensure it's set to obtain an IP address automatically (DHCP).
Test the Connection: Open a web browser and try to access a website to confirm that your wired connection is working correctly.
Setting up a Wireless Connection:
Access the Gateway:
Open a web browser on your computer or mobile device.
In the address bar, type the Gateway's default IP address, which is usually http://10.0.0.1 or http://192.168.0.1, and press Enter.
You will be prompted to log in. Enter the default username and password, which can usually be found on a label on the Gateway itself or in your Gateway documentation. If you've changed the login credentials before, use those.
Change Wi-Fi Network Name (SSID) and Password:
Navigate to the Wi-Fi or Wireless settings section of the Gateway's web interface.
Change the SSID (Wi-Fi network name) to something unique and memorable.
Set a strong Wi-Fi password (WPA or WPA2). Make it a combination of letters, numbers, and symbols for security.
Save Changes: After making these changes, save the settings, and wait for the Gateway to apply them. This might take a few minutes.
Connect to the Wi-Fi Network:
On your computer or mobile device, search for available Wi-Fi networks.
Locate and select the new SSID you just configured.
Enter the Wi-Fi password when prompted.
Test the Wireless Connection: Once connected, open a web browser and verify that you can access websites to ensure your wireless connection is working correctly.
That's it! You've now set up both a wired and wireless connection to your Comcast Xfinity Gateway. You can connect multiple devices to the Wi-Fi network using the same SSID and password you configured.
Contact Support.Com
If you are still having trouble, refer to the Step-By-Step Guide below, or Contact Support.Com for Personalized Assistance.
Your Comcast Wireless Gateway is fast and easy to setup.
This guide will walk you through the process.
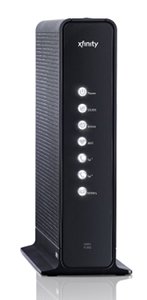
xFi Wireless GatewayxFi Advanced Wireless Gateway
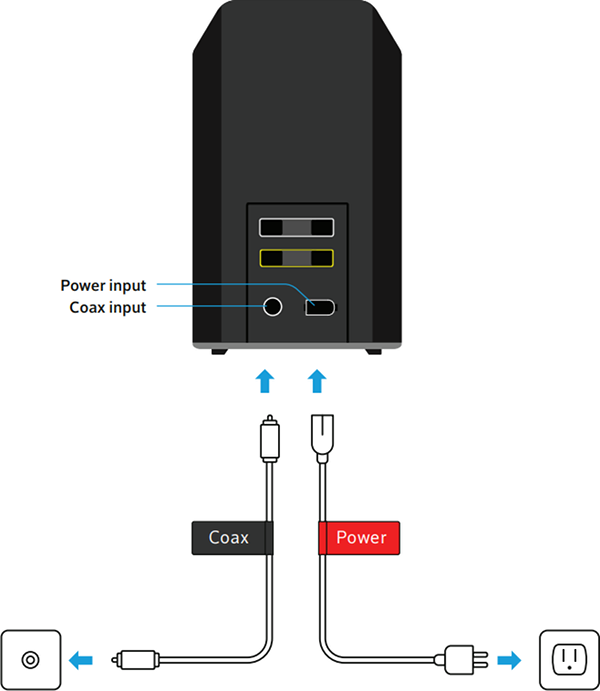
2. xFi Wireless Gateway: Connect Gateway
Connect the Coax cable to the back of your Gateway, and to the cable port in your home.
Connect the power cable to the back of your Gateway, and to an outlet in your home.
Wait for the Power, US/DS, and Online lights to stop flashing and go solid for one full minute.
When you first plug in your Gateway, it can take up to twenty minutes for it to automatically sync, update, and reboot multiple times with your Comcast service.
Do not unplug or turn off your Gateway during this time.
3. Networking: Wired or Wireless
Devices can be connected to a network in two ways: wired or wireless. In order to continue, we need to determine the type of connection your device has.
A wired connection is provided by an Ethernet cable. Most commonly, these are used by desktop computers and other equipment you don't move around often.
If your device is not connected to the router with a cable, then you are using a wireless connection.
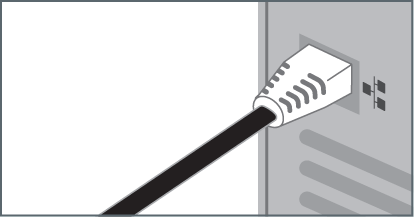
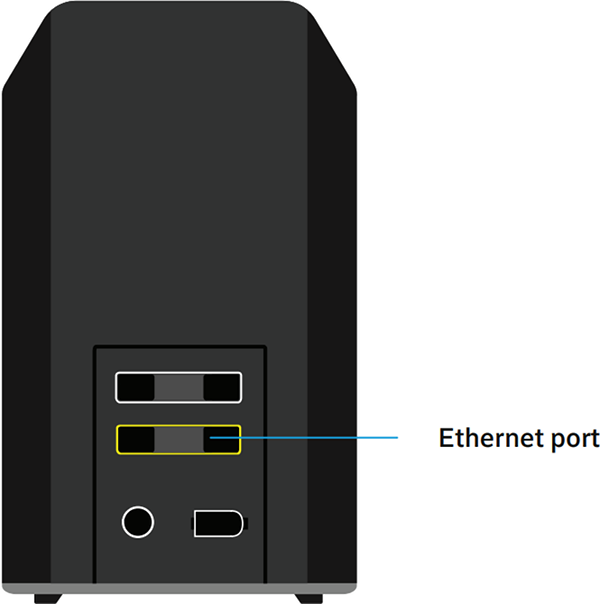
4. xFi Wireless Gateway: Wired Connection
Connect one end of the Ethernet cable to your Gateway.
Connect the other end of the Ethernet cable to your computer.
After a few moments, your computer will recognize the connection.
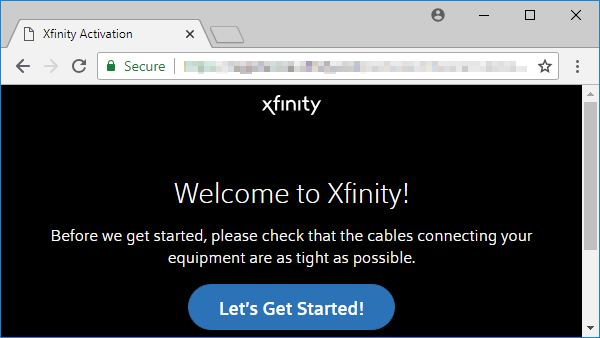
5. xFi Wireless Gateway: Initial Setup
Open your preferred web browser.
On your computer look for one of these icons.
On your smartphone or tablet, look for one of these icons.
In the address bar at the top, type xfinity.com/activate, then press enter or return.
Follow the instructions on screen to finish activating your Comcast account, and setting up a custom Wi-Fi network name.
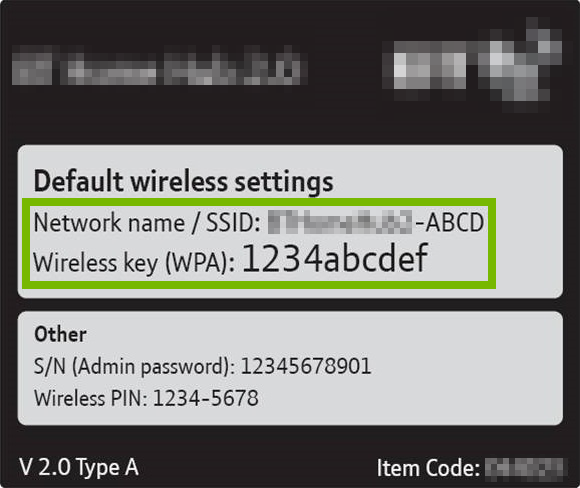
6. Wi-Fi Network: Credentials
In order to connect to a wireless network, you must have the required credentials. These are:
Wireless Network Name (SSID)
Wireless Network Key (Password)
Finding Network Credentials
Most wireless routers/gateways have a label with the default credentials. If the credentials aren't there, look in the devices documentation.
If your Internet Service Provider (ISP) installed the wireless router or gateway, they might have left you a setup sheet which may have the credentials.
7. Computer: OS Choice
To continue, we need to know what Operating System your computer is using.
There are 2 main Operating Systems for personal computers currently available, Microsoft Windows and Apple macOS.
Microsoft WindowsApple macOSMicrosoft Windows runs on computers produced by multiple companies, such as Lenovo, Asus, Dell, Toshiba, Hewlett Packard, Acer, and Sony.Apple is the only company that makes macOS computers.
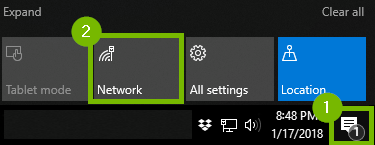
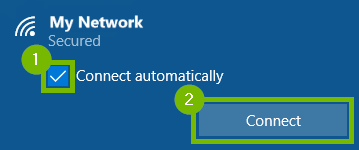
8. Windows 10: Connect to Wi-Fi
Click on the Notifications icon and then click on Network.
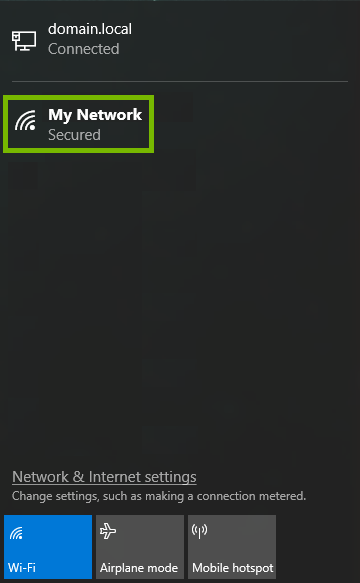
Click the network you wish to connect to.
Choose if you wish to automatically connect to your network, and then click on Connect.
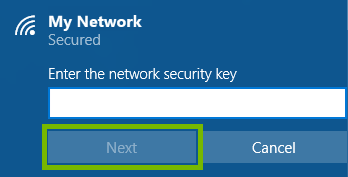
Enter in your security key and click Next.
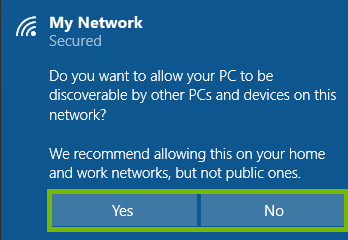
Choose whether or not you want to be visible to the network.
It is recommended to allow your PC to be discovered on private home networks because that allows you to see other wireless devices on the Network. If you're at a public location it is suggested to select "No".
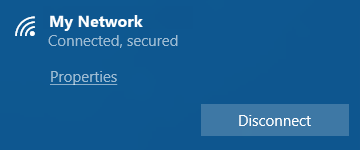
You can verify your connection by checking to see if it now says "Connected" next to the network.
9. macOS: Connect to Wi-Fi
Click the Wi-Fi icon in the menu bar. By default it will be in the upper right corner near the time and date.
If Wi-Fi is off, choose Turn Wi-Fi on.
The strength of each nearby network is shown next to its name. More darkened bars indicate a stronger network connection.
Select the Wireless Network Name (SSID) of the network you want to connect to.
Networks that have a lock icon next to their name require a password. After you select your network, enter the network password when you're prompted. If you don't know the network password, check with the owner of the Wi-Fi network you're trying to join.
10. Mobile: OS Choice
To continue, we need to know what Operating System your smartphone or tablet has.
There are 2 main Operating Systems for smartphones currently available, Android and iOS.
Android SmartphoneiOS SmartphoneAndroid smartphones are produced by multiple companies, such as Samsung, LG, Motorola, HTC, and OnePlus.Apple is the only company that makes iOS smartphones.
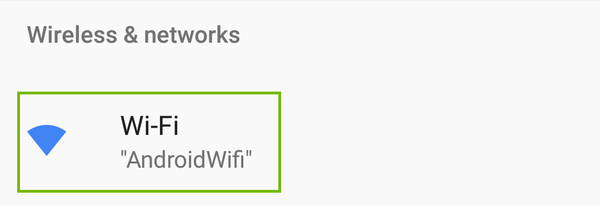
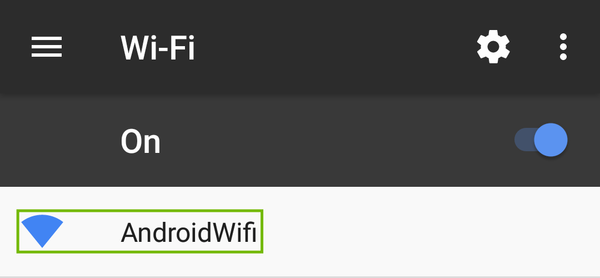
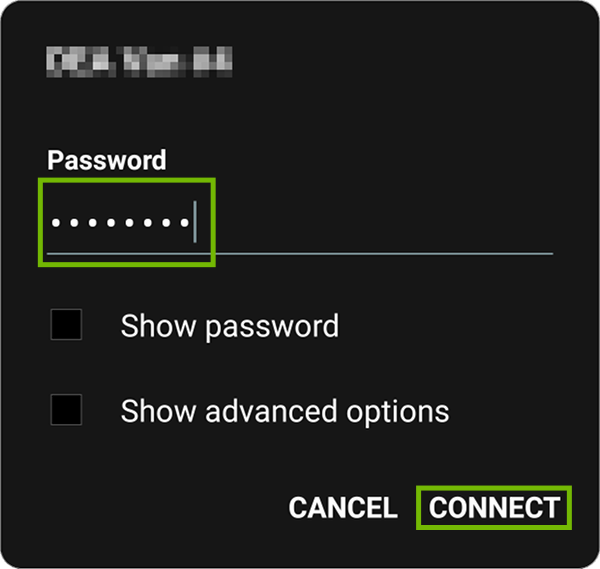
11. Android: Connect Wi-Fi
Open Settings on your phone or tablet.
Select Wi-Fi.
Select your home network from the list.
Enter your Wi-Fi password, then select Connect.
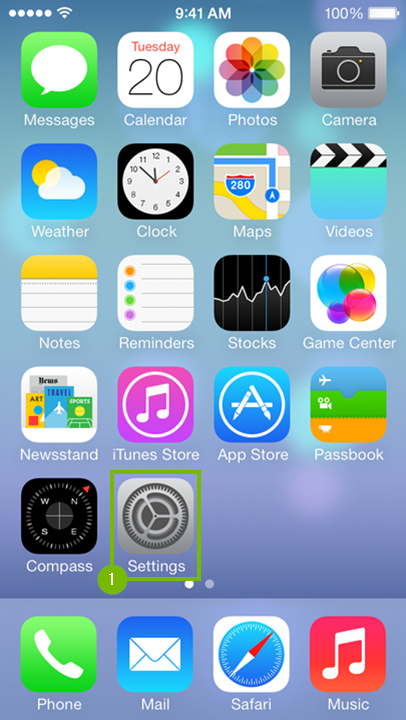
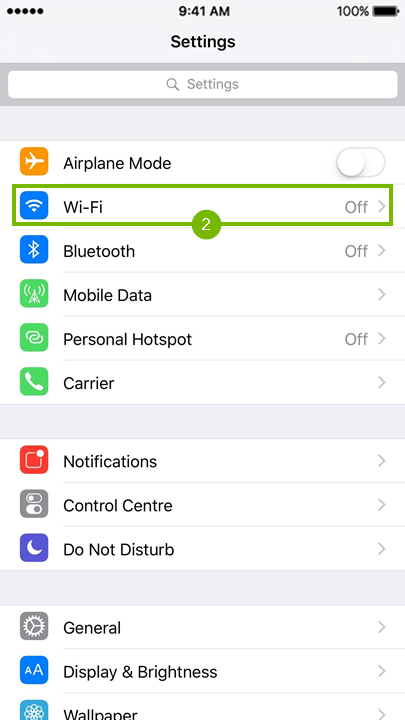
12. iOS: Connect to Wi-Fi
Depending on what device (iPhone, iPad or iPod Touch) and which generation you have, the menu theme and options might look slightly different on your screen. However, the steps should be the same across all iOS devices and generations.
From the main screen of your device, look for and open Settings.
After that, go to Wi-Fi. You will see that this option also shows one of three statuses to the right:
Off - the Wi-Fi feature is disabled
Not Connected - there is no Wi-Fi connection established
the Wi-Fi connections name - there is a Wi-Fi connection already established.
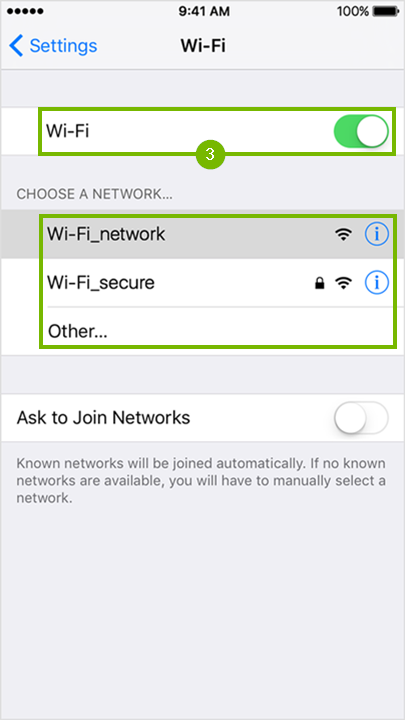
Make sure that the Wi-Fi feature is enabled by flipping the On/Off switch to the green position. Locate and tap the Wi-Fi networks name that you wish to connect to from the list.
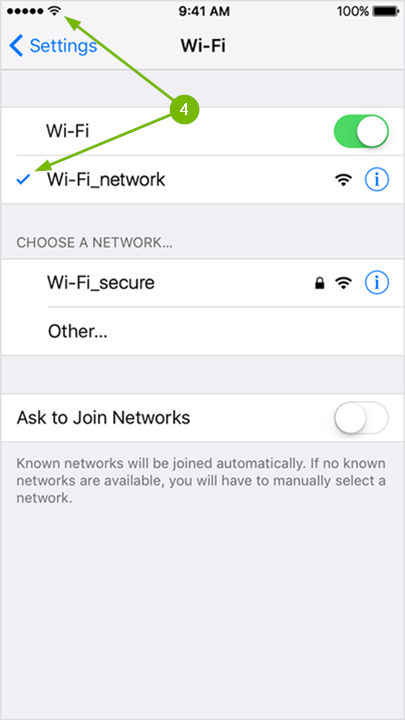
Your iOS device will automatically connect to the network if there is no security enabled, or you have connected to it in the past. The checkmark and Wi-Fi symbol indicate you are connected.
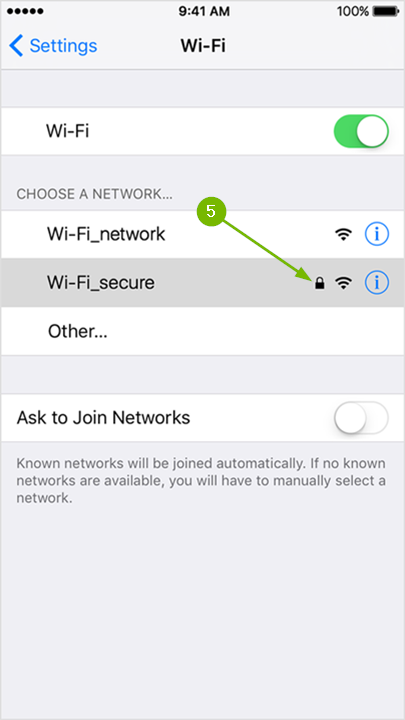
If the Wi-Fi network requires a password, then you will see a small padlock to the right of its name, which also means the connection is secure.
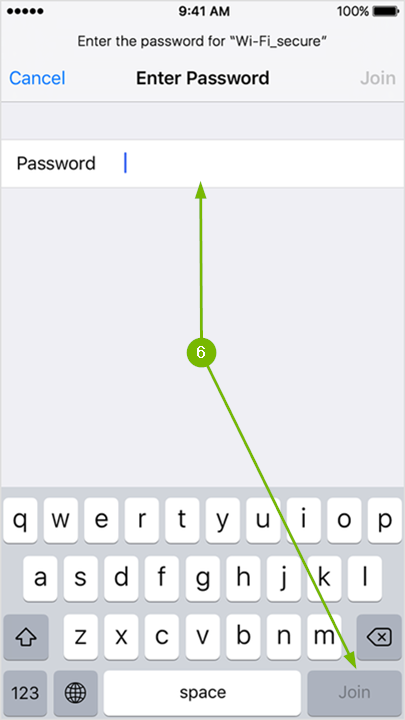
Tapping on a secured Wi-Fi networks name will prompt you to enter the password. Passwords are always case sensitive. Type it in using the on screen keyboard then tap Join on the bottom right corner. If tapping it does nothing, then it means the password you typed in is too short.
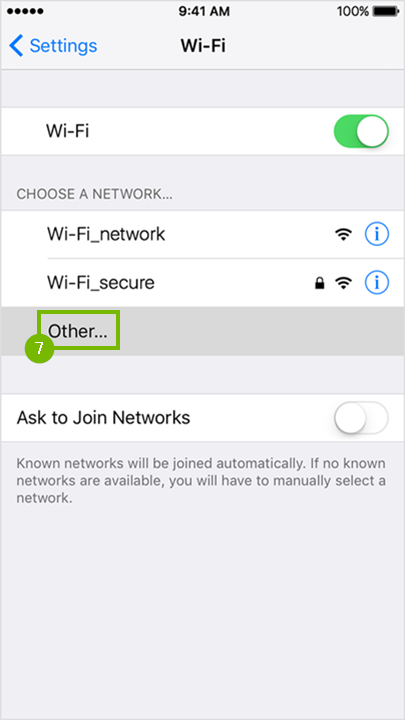
If the Wi-Fi network you are trying to connect to is hidden, then tap the Other... option.
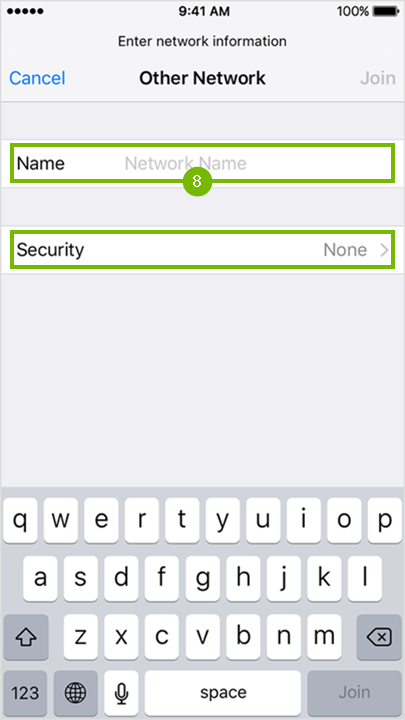
Enter the Wi-Fi networks name using the on screen keyboard and tap Join at the bottom right if no password is required to connect. If a password is needed to connect to the Wi-Fi network then tap on Security.
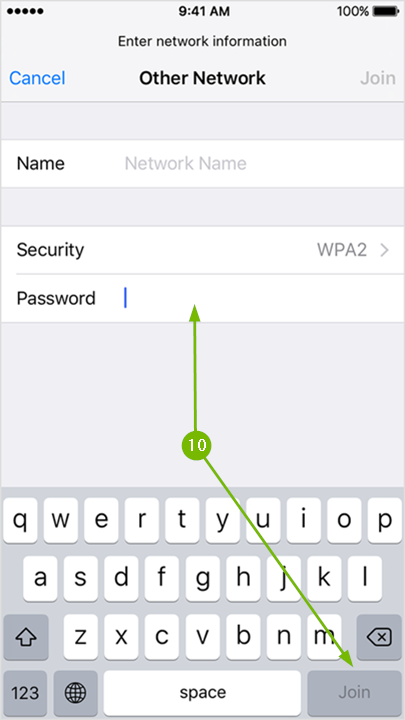
Choose the type of security the Wi-Fi network has by tapping on it.
Finally, type in the required Wi-Fi password and tap Join at the bottom right corner to connect.
At this point your iOS device should be connected to Wi-Fi.
Connect the Coax cable to the back of your Gateway, and to the cable port in your home.
Connect the power cable to the back of your Gateway, and to an outlet in your home.
The light on the top of your Gateway will blink green and yellow. Wait until this light is solid white for one full minute before continuing. When you first plug in your Gateway, it can take up to twenty minutes for it to automatically sync, update, and reboot multiple times with your Comcast service.
Do not unplug or turn off your Gateway during this time.
14. Networking: Wired or Wireless
Devices can be connected to a network in two ways: wired or wireless. In order to continue, we need to determine the type of connection your device has.
A wired connection is provided by an Ethernet cable. Most commonly, these are used by desktop computers and other equipment you don't move around often.
If your device is not connected to the router with a cable, then you are using a wireless connection.
.png)