We will guide you through the initial setup for your Honeywell smart thermostat. Before we begin, we should first determine how far you are along with the installation. If you've already installed the thermostat on the wall, then we can proceed to the initial setup and registration. If the thermostat isn't installed yet, we recommend having a professional install it and then returning here later.
2. Wi-Fi Network: Credentials
In order to connect to a wireless network, you must have the required credentials. These are:
Wireless Network Name (SSID)
Wireless Network Key (Password)
Finding Network Credentials
Most wireless routers/gateways have a label with the default credentials. If the credentials aren't there, look in the devices documentation.
If your Internet Service Provider (ISP) installed the wireless router or gateway, they might have left you a setup sheet which may have the credentials.
3. Thermostat: Power Up
The thermostat gets its power from the wiring in the wall that connects it to the home's heating/cooling system. If it is wired correctly and the circuit it is connected to is live, the device should be powered up and waiting on the initial setup.
4. Honeywell Wi-Fi Smart Thermostat: Navigation
Fan - Select fan mode.
Home - Touch to display Home screen.
Current time
Outdoor conditions - Outdoor temperature and humidity appear after registration.
Current status - Shows system mode (heat/cool).
Indoor conditions - Shows indoor tempertature and humidity.
Current setting - Change temperature setting and select temporary or permanent hold.
Settings - Touch to display options. Start here to set a program schedule.
Mode - Select system mode (heat, cool, auto, em heat).
Touch the language you want the thermostat to display, then touch Next. If, at any point during the setup, you need more information about the choices you need to make, touch Help.
Select Home or Business installation, then touch Next.
Name the thermostat location, then touch Next.
Select what type of heating and cooling equipment your thermostat will control and touch Next.
Select your system type and touch Next then touch Done.
Touch Yes to connect the thermostat to your Wi-Fi network.
Select your Wi-Fi network's name.
Then type your Wi-Fi password if needed and touch Done.
Touch OK to display the registration information screen.
Note your Thermostat MAC and Thermostat CRC. You need these numbers to complete the online registration later.
If you touch Done before registering, the thermostats home screen will show an alert asking to register. Touch the alert to display the registration information or snooze the task.
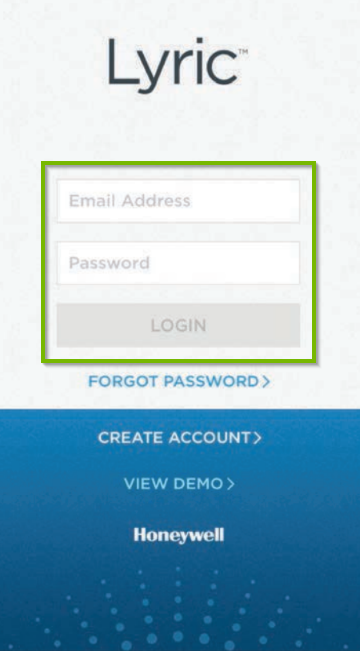
6. Honeywell Smart Thermostat: Register Online
To access your Wi-Fi thermostat remotely, you must have a Total Connect Comfort account.
Using a computer or mobile device, go to the mytotalconnectcomfort.com website.
Login with your account information or Create An Account if you don't already have one.
If you just created an account, check your email for an activation message from My Total Connect Comfort and click on the provided link to activate your new account.
Fill in your thermostats location information, then enter its unique identifiers, the MAC ID and MAC CRC which you took note of during the initial setup. You can also find them on the back of the thermostat or on the ID card that came with the thermostat.
Once registered successfully, you will get a confirmation message on the screen.
7. Lyric Round Wi-Fi Thermostat: Navigation
Cooling - Turn on/off
Weather - View 6 and 12 hour forecasts
Home/Away - Set to Home/Away
Heating - Turn on/off
Desired temperature - Turn to set your desired temperature
8. Lyric Round Wi-Fi Thermostat: Enable Wi-Fi
A Honeywell Lyric Round thermostat that has not yet been set up will display a Wi-Fi network name on its display.
If it's not showing the Wi-Fi network name, press and hold the Weather symbol for 5 seconds to reset.
You will need to connect your mobile device to this Wi-Fi network, after you install the Honeywell Lyric app on it.
9. Honeywell Lyric App: Install
Applicable to:
Lyric Round Wi-Fi Thermostat - Second Generation
Lyric T5 Wi-Fi Thermostat
This app will guide you through the basic setup of your thermostat.
10. Honeywell Lyric App: Install on Android
Launch the PlayStore app on your Android device.
Search for "Honeywell Lyric" in the search box at the top. Select the app from the list of results.
Tap on Install.
Once installed, tap Open to launch the app immediately if you wish.
11. Android: Connect Wi-Fi
Depending on what device (Smartphone or Tablet) and which generation you have, the menu theme and options might look slightly different on your screen. However, the steps should be similar across all Android devices and generations.
From the main screen of your Android device, tap on the Apps button.
Then look for and tap on Settings.
Go to Wi-Fi.
Make sure the Wi-Fi feature is enabled by flipping the On / Off switch to the On position then wait for the network list to populate and tap on the Wi-Fi network that you want to connect to.
Your Android device will automatically connect to the network if there is no security enabled, or you have connected to it in the past. The Wi-Fi network name will show Connected underneath and the Wi-Fi symbol will fill up in the top right corner of the screen.
If the Wi-Fi network requires a password, then you will see a small padlock next to the Wi-Fi symbol, which also means the connection is secure. Tapping on a secured Wi-Fi networks name will prompt you to enter the password. Passwords are always case sensitive. Type it in using the on screen keyboard then tap Connect.
If the Wi-Fi network you are trying to connect to is hidden, then tap the More option which looks like three dots positioned vertically, on the top right corner of the screen, then tap Add network.
Enter the Wi-Fi networks name using the on screen keyboard and tap Save if no password is required to connect. If a password is needed to connect to the Wi-Fi network then tap on Security and select the security type. Type in the password, then tap Save.
At this point your Android device should be connected to Wi-Fi.
As an alternate way you can also try the following method:
Swipe downwards from the top side of the screen.
Look for the Wi-Fi symbol in the drop down menu and tap on the word below it. If you're not connected to any network, it will say Wi-Fi. If you're already connected to a network, it will show its name.
Make sure the Wi-Fi feature is enabled by flipping the On / Off switch to the On position then wait for the network list to populate and tap on the Wi-Fi network that you want to connect to.
12. Lyric Thermostat: Initial Setup
Launch the Honeywell Lyric app on your mobile device.
Login with your Honeywell account or create a new account if you don't already have one.
Tap Get Started. Since the install was performed by a professional you can skip through to the setup / configuration section.
Tap Next to start the configuration.
Set the temperatures you prefer when you're at home, then tap Next.
Choose between Automatic or Manual temperature adjustment when you're away, then tap Next.
Review the Configuration Summary then tap Next.
On the configuration completion screen you will be given the option to connect the thermostat to Wi-Fi. Tap Next to proceed.
Tap Start Connecting.
Select your Wi-Fi network name then type in the Wi-Fi password if needed.
It may take several minutes to establish a connection with your network and sync with Honeywell.
Once connected to Wi-Fi, tap Start Personalizing.
Set the Location Name and set the Thermostat Name then tap Next.
Complete your Profile to register your thermostat with Honeywell then tap Next.
Wait for the registration to complete.
Tap Next on the personalization completion screen.
Then tap Finish to complete the setup.
13. Honeywell Lyric App: Install on iOS
Launch the App Store on your iOS device.
Tap on Search at the bottom of the screen.
Search for "Honeywell Lyric" in the search box at the top. Select the app from the list of results.
Tap on Get, then on Install. Once installed, tap Open to launch the app immediately if you wish.
14. iOS: Connect to Wi-Fi
Depending on what device (iPhone, iPad or iPod Touch) and which generation you have, the menu theme and options might look slightly different on your screen. However, the steps should be the same across all iOS devices and generations.
From the main screen of your device, look for and open Settings.
After that, go to Wi-Fi. You will see that this option also shows one of three statuses to the right:
Off - the Wi-Fi feature is disabled
Not Connected - there is no Wi-Fi connection establishe
the Wi-Fi connections name - there is a Wi-Fi connection already established.
Make sure that the Wi-Fi feature is enabled by flipping the On/Off switch to the green position. Locate and tap the Wi-Fi networks name that you wish to connect to from the list.
Your iOS device will automatically connect to the network if there is no security enabled, or you have connected to it in the past. The checkmark and Wi-Fi symbol indicate you are connected.
If the Wi-Fi network requires a password, then you will see a small padlock to the right of its name, which also means the connection is secure.
Tapping on a secured Wi-Fi networks name will prompt you to enter the password. Passwords are always case sensitive. Type it in using the on screen keyboard then tap Join on the bottom right corner. If tapping it does nothing, then it means the password you typed in is too short.
If the Wi-Fi network you are trying to connect to is hidden, then tap the Other... option.
Enter the Wi-Fi networks name using the on screen keyboard and tap Join at the bottom right if no password is required to connect. If a password is needed to connect to the Wi-Fi network then tap on Security.
Choose the type of security the Wi-Fi network has by tapping on it.
Finally, type in the required Wi-Fi password and tap Join at the bottom right corner to connect.
At this point your iOS device should be connected to Wi-Fi.
15. Lyric T5 Wi-Fi Thermostat: Navigation
Desired temperature - Displays desired indoor temperature.
Mode - Select System mode Auto / Heat / Cool / Off / EM Heat (emergency heat).
Menu - Contains features: schedule, screen lock, ventilation, Wi-Fi, clean screen and other thermostat settings.
Fan - Select Fan mode Auto / On / Circulate.
Adjust temperature - Touch + or - to set your desired indoor temperature.
Indoor temperature - Displays current indoor temperature.
16. Lyric T5 Wi-Fi Thermostat: Enable Wi-Fi
Touch Start Setup on the thermostat display.
Touch Yes to use the mobile app to set up the thermostat.
The thermostat will display a Wi-Fi network name with the Lyric XXXXXX pattern.
You will need to connect your mobile device to this Wi-Fi network, after you install the Honeywell Lyric app on it.
17. What's next?
18. Thermostat: Pro Install
We recommend having the thermostat installed by a professional.
Please feel free to return to this guide for the "soft setup" once the thermostat has been physically installed and wired.
.png)