Authored by: Support.com Tech Pro Team
Connecting a Chromebook to a Wi-Fi network is a simple process. Chromebooks are designed to be user-friendly, and setting up a Wi-Fi connection should take just a few steps. Here's a comprehensive guide on how to connect your Chromebook to a Wi-Fi network:
Make sure your Chromebook is powered on and ready for setup.
Click on the network icon in the bottom-right corner of your screen. This icon usually looks like a series of concentric arcs, resembling a signal strength indicator.
A list of available Wi-Fi networks will appear. If you don't see any networks listed, ensure your Wi-Fi is turned on. You can toggle Wi-Fi on or off by clicking the network icon and using the switch.
Click on the name of your Wi-Fi network from the list of available networks.
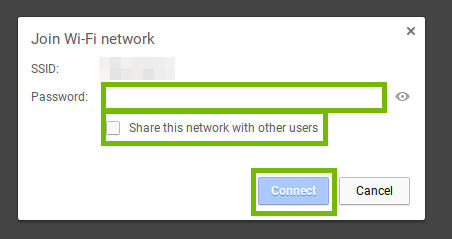
If your Wi-Fi network is password-protected, you'll be prompted to enter the Wi-Fi password.
Type the Wi-Fi password carefully. Passwords are case-sensitive.
You can choose to show the password while typing it by clicking the eye icon next to the password field for added accuracy.
Click the "Connect" button or press "Enter" on your keyboard to connect to the selected Wi-Fi network.
Your Chromebook will attempt to connect to the network. If the Wi-Fi password is correct and the network is in range, your Chromebook should establish a connection within a few moments.
Look at the network icon in the bottom-right corner. If the Wi-Fi icon shows signal strength bars, your Chromebook is connected to the network.
To ensure your Wi-Fi connection is working correctly, open a web browser and try visiting a website or accessing online resources.
If you want your Chromebook to forget a Wi-Fi network, follow these steps:
Click on the network icon.
Click the Wi-Fi network you want to forget.
Click "Forget."
If you want to temporarily disconnect from Wi-Fi without forgetting the network, follow these steps:
Click on the network icon.
Click the network name.
Click "Disconnect."
To reconnect to a Wi-Fi network, click on the network icon, select the network name, and enter the password if required.
Congratulations! You've successfully connected your Chromebook to a Wi-Fi network. You can repeat this process whenever you need to connect to a different network or if you change your Wi-Fi password.
Remember to keep your Wi-Fi password secure and only share it with trusted individuals to maintain the security of your network.
If you are still having trouble, refer to the Step-By-Step Guide below, or Contact Support.Com for Personalized Assistance.
In order to connect to a wireless network, you must have the required credentials. These are:
Most wireless routers/gateways have a label with the default credentials. If the credentials aren't there, look in the devices documentation.

If your Internet Service Provider (ISP) installed the wireless router or gateway, they might have left you a setup sheet which may have the credentials.


To help troubleshoot the problem we should check if other devices can connect to the wireless network.
If other wireless devices are connected to the network and functioning properly, chances are the router is OK. It's possible there is an environmental issue. Do you have a portable wireless device (Smart Phone, Tablet, Laptop, etc.) that you can put in the same area to test and see if that device's wireless connection still functions as intended in that location?
There are 2 main ways to restart your Chromebook. The first method is preferred.


The device needs to be within a reasonable range of the router in order to connect and have the best connection speeds.
The above numbers are approximates only. Optimal range may vary based on router make and model.
Your router may need to be relocated to a more centralized location in order to provide better coverage for all your devices.


Since this appears to be a range issue that can be resolved by putting the router in closer proximity to the device's intended use area, we recommend moving the router to a more centralized location.
If wireless signal is not reaching your device, and relocating your router or the device itself to be in closer proximity is not possible or doesn't resolve the issue, a great way to boost wireless signal without replacing existing equipment is to acquire and install a range extender. Range extenders work with your existing wireless router as a type of wireless repeater used to expand the reach of wireless signal in your home.