Updating your Chromebook is essential to ensure that it runs smoothly, securely, and efficiently. Chrome OS is designed to make the update process straightforward. This comprehensive guide will walk you through the steps to update your Chromebook to the latest version.
1. Understanding Chrome OS Updates:
Chrome OS updates include security patches, bug fixes, and new features.
Keeping your Chromebook up-to-date is crucial for performance and security.
2. Checking for Updates:
Click the clock in the bottom-right corner of your Chromebook's screen.
Click the settings gear to open the settings menu.
Scroll down and select "About Chrome OS."
3. Downloading and Installing Updates:
Under "About Chrome OS," click "Check for Updates."
If updates are available, your Chromebook will begin downloading them.
Once downloaded, click "Restart" to install the updates.
4. Automatic Updates:
Chrome OS is designed to automatically download and install updates in the background.
It's important to regularly restart your Chromebook to complete the installation of updates.
5. Managing Updates:
You can manage how updates are applied by clicking "Change channel" under "About Chrome OS."
The Stable channel offers the most stable and reliable updates, while Beta and Developer channels provide early access to new features but may be less stable.
6. Troubleshooting Update Issues:
If you encounter problems during the update process, try the following:
Check your internet connection.
Restart your Chromebook and try updating again.
Ensure you have enough free storage space.
Disable any VPN or proxy services during the update.
7. Performing a Powerwash (Factory Reset):
If update issues persist and your Chromebook becomes unusable, consider a Powerwash to reset it to factory settings:
Click the clock, select "Settings," and scroll down.
Click "Advanced" and then "Reset settings."
Choose "Powerwash" and follow the on-screen instructions. Be sure to back up your data before proceeding.
Updating your Chromebook is a straightforward process that ensures your device remains secure and functional. Regularly check for updates, and if you encounter any issues, follow the troubleshooting steps outlined in this guide. Keeping your Chromebook up-to-date will help you enjoy the latest features and maintain optimal performance.
Contact Support.Com
If you are still having trouble, refer to the Step-By-Step Guide below, or Contact Support.Com for Personalized Assistance.
1. Introduction: Chromebook: Update Issues
Your Chromebook does its best to keep itself up-to-date automatically by checking every time you turn it on. When you run into problems, it can be frustrating. This guide will take you through steps to try to resolve those problems.
2. Chromebook: Check Connection
Open Google Chrome.
In the address bar at the top, type www.google.com, then push the Enter key on your keyboard. The Google search page should come up.
Try entering something in the search bar, then select Google Search.
Your search results should open up. If they do, you are connected to the Internet.
3. Chromebook: Restart
There are 2 main ways to restart your Chromebook. The first method is preferred.
Shut Down From Menus
Select the User menu by clicking your profile picture in the bottom-right corner.
Select the Power symbol. Your Chromebook will turn off.
Wait 10 seconds.
Push the Power Button on your Chromebook to turn it back on.
Shut Down With Hardware
Push and hold the Power Button on your keyboard for 10 seconds.
Wait 10 seconds.
Push the Power Button on your Chromebook to turn it back on.
4. Chromebook: Update
Your Chromebook automatically checks for updates on startup. This step will walk you through checking manually.
Select the User menu by clicking your profile picture in the bottom-right corner.
Select Settings.
Select the Menu in the top-left.
Select About Chrome OS or About Chromium OS on the bottom left of the menu.
Select Check For Updates.
If your device is up-to-date, it will show that here.
If there is an update pending, you will be asked to reboot. Choose to reboot, and your device will reboot and update on its own.
5. Chromebook: Backup Check
The next step will be factory resetting your Chromebook. This will lose any data currently on your device. It is important to have your data backed up before proceeding, so you don't lose anything.
6. Chromebook: Factory Reset
Select the User menu by clicking your profile picture in the bottom-right corner.
Select Settings.
Select the Menu in the top-left.
Select Advanced.
Select Reset.
Select Powerwash.
Select Restart.
Your Chromebook will reboot.
You will be asked if you wish to reset your device. Select Powerwash.
Select Continue to confirm.
Your Chromebook will perform the factory reset, then reboot, just like new.
7. Chromebook: Initial Setup
First, choose Let's go.
If you're using a wireless connection, select your Wi-Fi network here.
Fill in your Wi-Fi password, then select Connect.
Next, you'll be asked to log into your Google account.
8. Chromebook: Connect Google Account
Existing Google Account
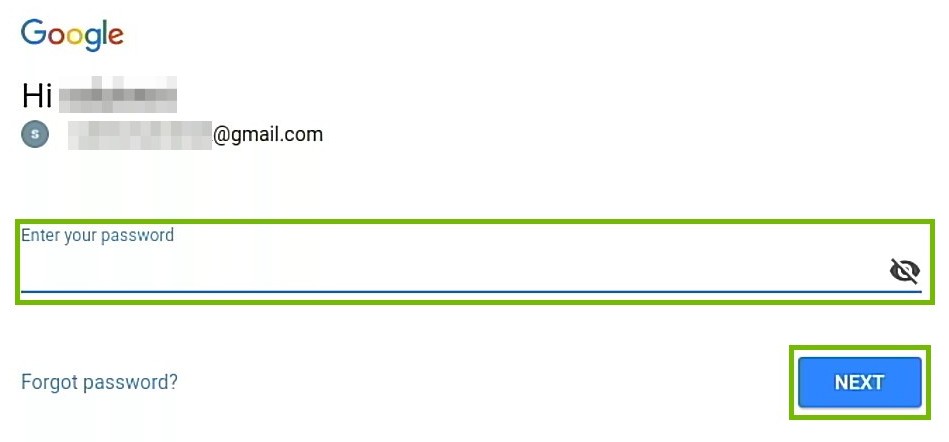
Enter your GMail e-mail address, then select Next.
Enter your Google password, then select Next.
If you have 2-step Verification enabled, you'll be prompted for the that now. Once filled in, select Next.
9. Chromebook: Complete Setup
Next, you'll be shown the Terms and Conditions. Read these carefully. When you're done, scroll to the bottom, and choose I Agree.
Select Next.
Select a picture for your profile, then select OK.
You'll be given an option to Take a tour of your Chromebook. It's a great idea to take this simple tour to get you up to speed fast with your new Chromebook! If you'd rather look at the tour later, and start using your Chromebook right away, click the X in the right corner.
10. Chromebook: Update
Your Chromebook automatically checks for updates on startup. This step will walk you through checking manually.
Select the User menu by clicking your profile picture in the bottom-right corner.
Select Settings.
Select the Menu in the top-left.
Select About Chrome OS or About Chromium OS on the bottom left of the menu.
Select Check For Updates.
If your device is up-to-date, it will show that here.
If there is an update pending, you will be asked to reboot. Choose to reboot, and your device will reboot and update on its own.
11. What's next?
12. Chromebook: Sync Account Settings
Select the User menu by clicking your profile picture in the bottom-right corner.
Select Settings.
Scroll down. Under People, select Sync.
Make sure the toggle-switch on the right for Sync everything is turned on.
13. Chromebook: Backup to Google Drive
Your Chromebook does not save files locally in most cases. The only exception to this is any files you've downloaded that you may wish to save. This step will guide you through checking your Downloads, and saving them to Google's servers to keep them safe.
Select the Apps menu in the bottom-left corner.
Select All Apps > Files.
Select Downloads on the left. These are the only files stored on your Chromebook.
You can open a file by double-clicking on it.
You can copy files to your Google Drive by dragging them to My Drive on the left. Copying a file to Google Drive places them on Google's servers, so they won't be lost if your Chromebook is restored.
14. Chromebook: Connection Type
What type of connection do you wish to use for your Chromebook? If you do not have a special wire to connect to get online, you are using a Wi-Fi connection.
15. Connect Device to Network via Ethernet
Acquire an Ethernet cable.
Take one end of the cable and plug it into your router/modem's Ethernet port.
Plug the other end of the cable into your device's Ethernet port.
Ethernet Cable
Ethernet Port
16. Chromebook: Connect to Wi-Fi
Select the User menu by clicking your profile picture in the bottom-right corner.
Select the triangle > next to the network option.
Make sure Wi-Fi is turned on at the top of the menu. Then, select your Wi-Fi network, it will usually be at or near the top.
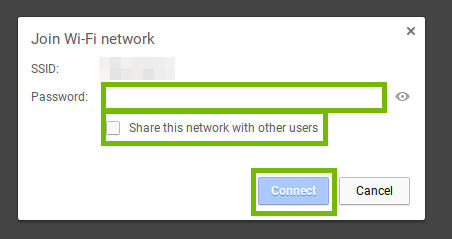
Enter your Wi-Fi password. You may also want to place a check mark next to Share this network with other users, so other people who use this Chromebook can connect to this Wi-Fi network as well. Then, select Connect.
When you are connected, the Wi-Fi icon will show as filled in in the bottom right-hand corner.
.png)