How to Enable the Security Auditing of Active Directory
Authored by: Support.com Tech Pro Team
1. Introduction
How to Enable the Security Auditing of Active Directory
2. Enable the Security Auditing
For security auditing, it is required to either modify default domain policy or create a new Group Policy Object and edit it. You have to, in fact, deal with Advanced Audit Policy Configuration for this. Perform the following steps for enabling the security auditing of Active Directory in Windows Server 2012.
Go to Start Menu → Administrative Tools → Group Policy Management.
In the left pane, navigate to Forest → Domains → Domain Name. Expand it.
You can select either ‘Default Domain Policy’ or create a new Group Policy Object.
Right-click on ‘Default Domain Policy’ or other Group Policy Object.
Click ‘Edit’ in the context menu. It shows ‘Group Policy Management Editor’.
Go to Computer Configuration → Policies → Windows Settings → Security Settings → Advanced Audit Policy Configuration → Audit Policies.
It lists all audit policies in the right pane. Here, you have to enable the following policies for both ‘Successful’ and ‘Failed’ events.Type of AuditingPathDomain Logon/Logoff AuditingIn ‘Logon/Logoff’, enable
Audit Logon
Audit Logoff
File System AuditingIn ‘Object Access’, enable
Audit Detailed File Share
Audit File Share
Audit File System
Registry AuditingIn ‘Object Access’, enable
Audit Registry
Auditing of Handle ManipulationIn ‘Object Access’, enable
Audit Handle Manipulation
Double click any of above events listed in the table to access its properties.
Check the box ‘Configure the following audit events’ and then enable the required ‘Success’ and ‘Failure’ events.
Click ‘Apply’ and ‘OK’ to enable the monitoring for the selected events.
Similarly, you can configure the advanced auditing policies for other available options as well.
3. Enable the Global Object Access Auditing
Perform the steps below to audit the access of any object globally on the server.
Go to Start Menu → Administrative Tools → Group Policy Management.
In the left pane, navigate to ‘Forest → Domains → Domain Name. Expand it.
You can select either ‘Default Domain Policy’ or create a new Group Policy Object.
Right-click on ‘Default Domain Policy’ or another Group Policy Object.
Click ‘Edit’ in the context menu. It shows ‘Group Policy Management Editor’.
Go to Computer Configuration → Policies → Windows Settings → Security Settings → Advanced Audit Policy Configuration → Audit Policies. It lists all audit policies in the right pane.
Go to ‘Global Object Access Auditing’ node under ‘Audit Policies’ of advanced configuration.
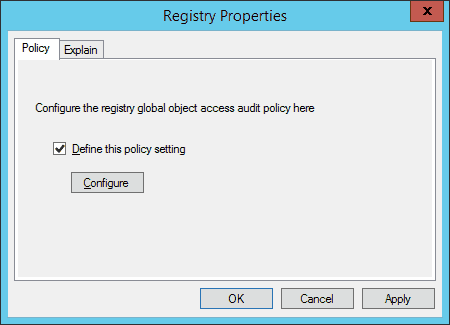
Double click ‘Registry’ entry in the right details pane.
Check the box ‘Define this policy’. It enables the subsequent button.
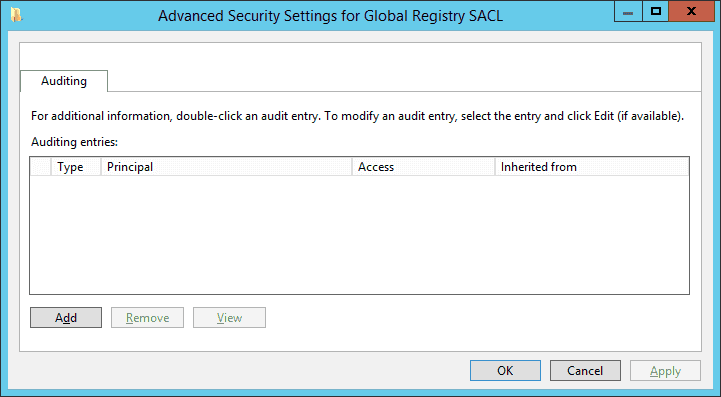
Click ‘Configure’ to access the advanced Settings for Global Registry SACL’.
Click ‘Add’ to add users or groups of which access you want to audit. It shows ‘Auditing Entry for Global Registry SACL’ window.
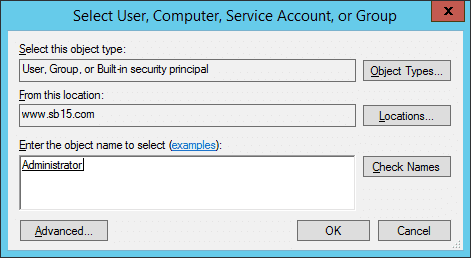
Click ‘Select a Principal’ link. It shows ‘Select User, Computer, Service Account or Group’ dialog box on the screen.
Type the name of a user or group of which access you want to audit.
Click ‘Check Names’ button to validate the name.
Click ‘OK’. It takes you back to ‘Auditing Entry’ window.
Select ‘All’ in ‘Type’ drop-down menu.
Please make sure all 16 permissions are checked.
Click ‘OK’. It adds the rule to audit the selected user’s access to the registry and takes you back to ‘Advanced Security Settings’ window.
Click ‘Apply’ and ‘OK’. It takes you back to event properties.
Click ‘Apply’ and ‘OK’.
You can follow the similar above steps to configure ‘File System’ policy in ‘Global Object Access Auditing’.
4. Manage the Integrity of Advanced Auditing
The advanced auditing entries are often overwritten by the entries of basic auditing. Perform the following steps to configure that the advanced auditing entries will not be overwritten.
Go to Start Menu → Administrative Tools → Group Policy Management.
In the left pane, go to Forest → Domains → Domain Name. Expand it.
You can select either ‘Default Domain Policy’ or create a new Group Policy Object.
Right-click on ‘Default Domain Policy’ or another Group Policy Object.
Click ‘Edit’ in the context menu. It shows ‘Group Policy Management Editor’.
In the left tree pane, go to Computer Configuration → Policies → Windows Settings → Security Settings → Security Options.
Double click ‘Audit: Force audit policy subcategory settings (Windows Vista or later) to override audit policy category settings’.
Click ‘Define this policy setting’ and click ‘Enabled’.
Click ‘Apply’ and ‘OK’.
5. Update Group Policy Object
Start the command prompt or ‘Run’ prompt as an Administrator and execute the following command.
gpupdate /force
It applies the modified security auditing policies on the server. Alternatively, you can log off and log on to the Administrator.
Verify the Auditing Policies
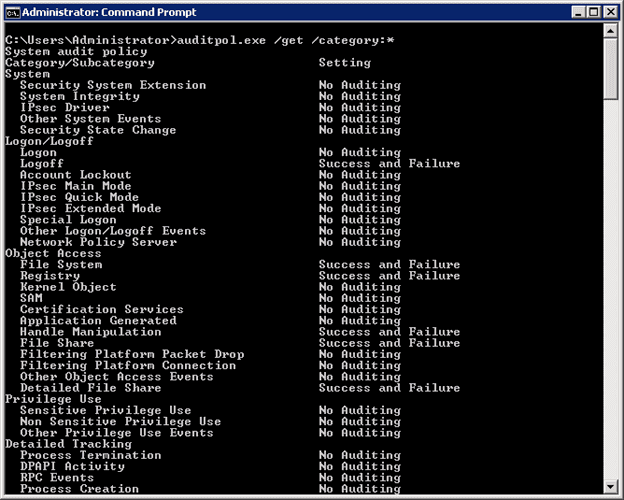
It is time to verify whether the modified auditing policies have been applied or not. Run the following command on the Command Prompt.
auditpol.exe /get /category:*
It lists the status of all auditing policies (both basic and advanced) on the server. Please verify both ‘Success’ and ‘Failure’ events for the policies, which you have enabled.
6. Custom Views to Keep a Check
Once the security auditing of Active Directory has been enabled, you receive these events in the Security section under ‘Windows Logs’ in Event Viewer. You can customize the view to keep a check only on critical and error logs. Follow the steps below:
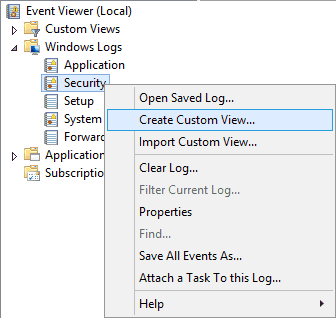
Right-click on Security to access the context menu.
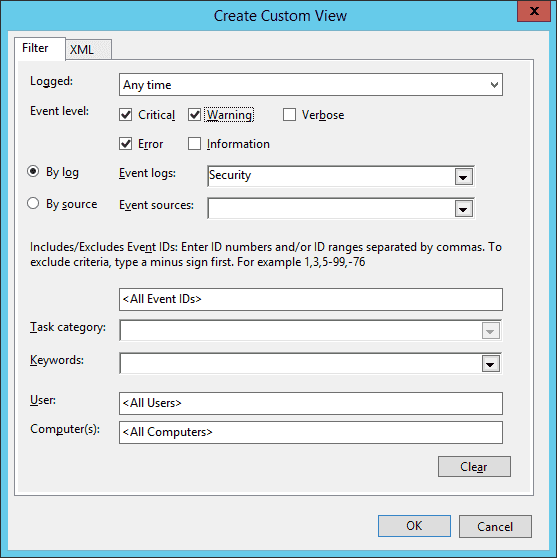
Click the ‘Create Custom View’ option. It shows the following dialog box.
Select ‘Critical’, ‘Error’, and ‘Warning’ to show only these types of logs in the new custom view. Keep ‘Security’ selected in ‘Event logs’.
Click ‘OK’. It shows the following box to save the created view.
You can provide a new name for this view.
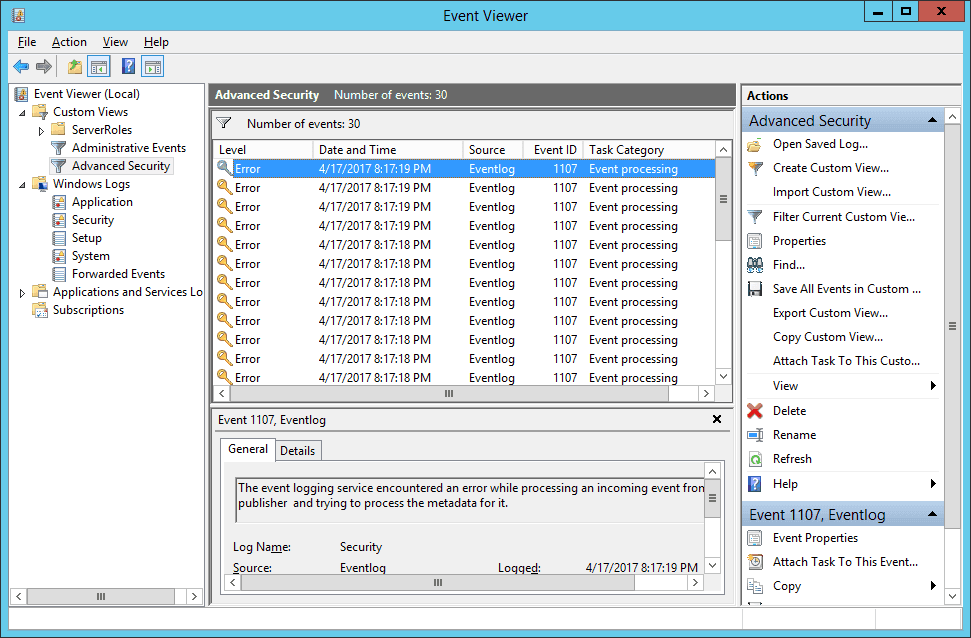
It will be displayed in the node ‘Custom Views’. You can also create a new folder to save this node by clicking ‘New Folder’.
A newly created custom view is displayed under ‘Custom Views’.
The right pane in this window shows a list of actions you can perform such as
Import Custom View: It lets you import the custom view, which can be exported later on.
Filter Current Custom View: Click it to customize the current view using the same dialog box, which you used to create it.
Properties: Click it to change the name and description of this view.
Find: Click it to search in the current view.
Other basic options let you rename, delete, or refresh the view.
.png)