Restrict explicit songs on your Apple Music Account.
Before We Begin:
Have a working Apple Music Account.
2. Restricting Explicit Content
Apple Music does not offer full-blown parental controls, but it can restrict explicit music, podcasts, and movies.
Media can be restricted using iTunes and the Apple Music app across various devices. iOS devices require that Screen Time be enabled in order to restrict explicit content.
3. Restrict Content (Android)
Content Restrictions must be set on each device you wish to restrict content on. These settings are device-specific, not account-bound, and will not synchronize across to other devices that make use of the same account.
Open the Apple Music app on your Android device.
Along the bottom of the screen, tap any of the Library, For You, Browse, or Radio options.
Tap the Menu button.
Tap Settings.
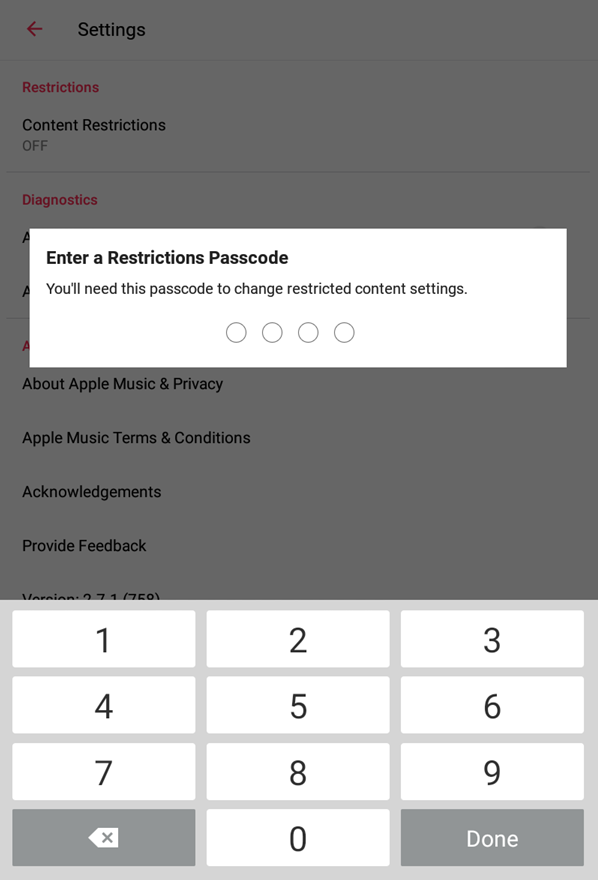
Then tap ContentRestrictions.
Enter a four-digit passcode.
Enter the same passcode again to confirm it.
Setting a passcode prevents anyone from making changes to restrictive settings without your approval. Be sure to remember your passcode, as it must be entered if you wish to make changes to your restrictive settings in the future. If you forget your passcode, there is no way to recover it. The Apple Music app must be removed from your device & reinstalled.
Tap the Enable Content Restrictions toggle switch to turn it on.
Then select the restrictions that you want:
Tap Music to turn off access to explicit content.
Tap Movies to select which ratings you want to allow access to or turn off access to movies entirely.
Tap TV Shows to select which ratings you want to allow access to or turn off access to TV shows entirely.
Tap Profiles to turn off access to the profiles of other Apple Music users.
After Content Restrictions are set, songs, albums, or video content with restricted ratings or anything flagged as explicit content may be returned within search results and can be visible within other tabs of the Apple Music app, but your device will be restricted from playing them. The Radio feature will also play only clean versions of songs.
4. Restrict Content (iOS)
Open Settings on your device.
Tap Screen Time.
Select Content and Privacy Restrictions.
Enable Content & Privacy Restrictions by tapping the toggle Switch.
Tap Content Restrictions.
Tap Music, Podcasts & News.
Select Clean to limit content, then tap Back to return to the previous menu.
Tap Music Profiles & Posts.
Turn Music Profiles & Posts off.
Your iOS device is now restricted from listening to explicit content.
5. Restrict Content (macOS)
Open iTunes.
Click iTunes, then click Preferences.
Select Restrictions.
From the Disable field, Podcasts, Internet Radio, iTunes Store, Apple Music, Music Profiles & Posts, and/or Shared Libraries can all be disabled by clicking its respective checkbox.
From the Restrict field, Music with explicit content, movies based on rating, TV shows based on ratings, and books with explicit content can all be disabled by clicking its checkbox and selecting a rating if need be.
To ensure that other users cannot make changes to the restrictive settings you've put into place, the Lock icon in the lower-left corner of the window can be used. Click the Lock and enter your Mac's administrator password to toggle these settings between being locked or unlocked.
6. Restrict Content (Windows)
Open iTunes.
Click Edit, then click Preferences.
Select Restrictions.
From the Disable field, Podcasts, Internet Radio, iTunes Store, Apple Music, Music Profiles & Posts, and/or Shared Libraries can all be disabled by clicking its respective checkbox.
From the Restrict field, Music with explicit content, movies based on rating, TV shows based on ratings, and books with explicit content can all be disabled by clicking its checkbox and selecting a rating if need be.
To ensure that other users cannot make changes to the restrictive settings you've put into place, the Lock icon in the lower-left corner of the window can be used. Click the Lock and enter your Mac's administrator password to toggle these settings between being locked or unlocked.
.png)